Liquibase extensions for data modeling
- 1. Overview
- 2. Table management
- 3. Managing search conditions
- 4. Managing custom data types
- 5. Creating a many-to-many relationship type
- 6. Saving multiple entities within a single transaction
- 7. Generating endpoints for partial updates of database entities
- 8. Managing analytics views
- 9. Managing access rights to analytical data
- 10. Using nested structures in registry database tables by a specified parameter
- 11. Managing the code review process
| 🌐 This document is available in both English and Ukrainian. Use the language toggle in the top right corner to switch between versions. |
| Use UTF-8 encoding to describe the registry data model. |
1. Overview
The registry data model is described declaratively using XML templates, which are interpreted and processed by the Liquibase tool. During processing, these templates are converted into SQL structures for creating or modifying databases.
Since the standard Liquibase functionality does not cover all the needs when working with complex data structures, the Platform uses a custom extension library — liquibase-ddm-ext. This library adds support for custom tags (referred to as change types in Liquibase terminology), extending the capabilities of XML templates to describe specific business logic and structures.
The liquibase-ddm-ext integration offers the following benefits:
-
Flexible schema management with support for custom changes.
-
Support for specialized changes and operations beyond standard Liquibase functionality.
-
Simplified database modification through a unified XML-based approach.
|
The latest version of the XSD schema provides a complete list of extended tags and their parameters. You can view it at the following link: |
For more details about the liquibase-ddm-ext library, refer to the Platform’s architectural documentation at: Library liquibase-ddm-ext.
|
2. Table management
2.1. Creating tables
The createTable tag creates a table in the database.
When using the createTable tag, you must also use the ext:historyFlag attribute and set it to true. This extended attribute is used to track the history of changes.
XML schema example
<createTable tableName="test" ext:historyFlag="true">
    <column name="role_id" type="BIGINT">
        <constraints nullable="false" primaryKey="true" primaryKeyName="pk_pd_subject_role"/>
    </column>
    <column name="role_name" type="TEXT">
        <constraints nullable="false"/>
    </column>
</createTable>|
Each Therefore, the |
| For details on creating tables, see data-modeling/data/physical-model/liquibase-changes-management-sys-ext.adoc#create-table-hst. |
2.1.1. Table creation attributes and possible values
2.1.1.1. bulkLoad attribute
The bulkLoad attribute lets you quickly load data into tables from files or arrays.
- Possible values:
-
-
true: Enable bulk data loading into the table from files (for example, CSV) or arrays (LIST). This ensures optimal performance and efficiency when working with large datasets. -
false: Disable bulk data loading into the table from files or arrays. In this case, data is imported into the table using separateINSERToperations, which can be less efficient when working with large volumes of data.
-
Example of creating a table with bulkLoad="true"
<changeSet author="..." id="initial creation">
	<ext:createTable name="example_bulk" bulkLoad="true">
		<column name="id" type="UUID" defaultValueComputed="uuid_generate_v4()">
			<constraints nullable="false" primaryKey="true" primaryKeyName="pk_example_bulk_id"/>
		</column>
		<column name="first_name" type="text"/>
            ...
            ...

	</ext:createTable>
</changeSet>
2.1.1.2. readMode attribute
The readMode attribute lets you control the read behavior for the registry’s database tables. It determines how the system should read data from the table: synchronously or asynchronously. Set the read behavior depending on your performance requirements.
- Possible values:
-
-
sync: Set synchronous read mode. In this mode, the system reads data in a sequence (data is read at theregistry-rest-apilevel). The read request is blocked until the database server returns data. This means the application is paused while waiting for the query results. The synchronous mode can be useful in cases where it is important to ensure the sequence of operations. -
async: Set asynchronous read mode. In this mode, the read request sent to the database server does not block the application from running (data is read viarest-api>registry-kafka-api>rest-api). Instead, the application continues working, and the reading results are processed when available. The asynchronous mode increases the application’s performance because it does not wait until the reading operations are completed. This can be useful in cases where it is necessary to process a large number of requests simultaneously or when the response time of the database server is unpredictable.
-
Example of creating a table with readMode="sync"
<changeSet>
	<ext:createTable name="example_read_mode" readMode="sync">
		<column name="id" type="UUID" defaultValueComputed="uuid_generate_v4()">
			<constraints nullable="false" primaryKey="true" primaryKeyName="pk_example_read_mode_id"/>
		</column>
		<column name="first_name" type="text"/>
            ...
            ...

	</ext:createTable>
</changeSet>
2.1.1.3. ext:autoGenerate attribute
The ext:autoGenerate attribute is a custom Liquibase extension attribute that automatically generates column values when inserting records into a table. It is used in the <column> tag.
Use this attribute to generate a unique and user-friendly number for an entity created in the registry (such as a document or certificate). The number is generated when the entity is saved and is unique within the registry instance.
XML schema
<createTable ...>
...
    <column name="column_name" ext:autoGenerate="AA-{dd-MM-yyyy}-{SEQ}">
    </column>
...
</createTable>
In this example, the ext:autoGenerate attribute defines a template for the column_name column values using the following format: AA-{dd-MM-yyyy}-{SEQ}
The system will automatically generate values that will look like this: AA-day-month-year-sequence.
Here "AA" is the document code, "day," "month," and "year" define the date in the dd-MM-yyyy format, and "sequence" contains a unique record number.
|
For details, see Generating a unique number for registry entities. |
2.2. Changing API behavior at the level of the table creation structure
Regulations developers can modify API behavior settings at the level of the table creation structure.
For this, you can use ext:alterTableApi, a custom Liquibase extension tag. This tag enables you to modify specific table attributes that do not affect the data structure but influence the API code generation.
For example, ext:alterTableApi can allow editing attributes such as bulkLoad or readMode that control the ability to load data into the table from files or arrays and the data read mode (synchronous or asynchronous), respectively.
|
For details on |
This tag helps regulations developers and modelers control API behavior settings for tables after they are created without changing the data structure.
The tag uses the ext:attribute extension, which accepts the key (name) and the value (value) of the attribute for which the behavior needs to be changed.
|
XML schema of using the ext:alterTableApi tag
<changeSet author="..." id="change api behavior">
	<ext:alterTableApi table="example_bulk_1">
		<ext:attribute name="bulkLoad" value="true"/>
		<ext:attribute name="readMode" value="sync"/>
	</ext:alterTableApi>
	<ext:alterTableApi table="example_bulk_2">
		<ext:attribute name="bulkLoad" value="false"/>
	</ext:alterTableApi>
</changeSet>
Use the
|
Extended XML schema. Deploying tables with certain attribute values and subsequently changing these values using the ext:alterTableApi tag
<databaseChangeLog>
	<changeSet author="..." id="initial creation">
		<ext:createTable name="example_bulk" bulkLoad="false">
			<column name="id" type="UUID" defaultValueComputed="uuid_generate_v4()">
				<constraints nullable="false" primaryKey="true" primaryKeyName="pk_example_bulk_id"/>
			</column>
			<column name="first_name" type="text"/>
            ...
            ...

		</ext:createTable>
		<ext:createTable name="example_read_mode" readMode="sync">
			<column name="id" type="UUID" defaultValueComputed="uuid_generate_v4()">
				<constraints nullable="false" primaryKey="true" primaryKeyName="pk_example_read_mode_id"/>
			</column>
			<column name="first_name" type="text"/>
            ...
            ...

		</ext:createTable>
	</changeSet>
	<changeSet author="..." id="change api behavior">
		<ext:alterTableApi table="example_bulk">
			<ext:attribute name="bulkLoad" value="true"/>
			<ext:attribute name="readMode" value="sync"/>
		</ext:alterTableApi>
		<ext:alterTableApi table="example_bulk">
			<ext:attribute name="bulkLoad" value="true"/>
		</ext:alterTableApi>
	</changeSet>
</databaseChangeLog>
3. Managing search conditions
You build the registry data model in the regulations using XML tags. One of these tags, <createSearchCondition>, creates search conditions, or SC for short. For example: <ext:createSearchCondition name="search_condition_test">.
Each condition contains information about search parameters such as the table and the column to search, which type of search to use, and so on.
Liquibase processes the XML model and creates view tables, virtual tables that contain information from one or more real tables within the database. View tables have a _v prefix added to their name—for example, search_condition_test_v.
When the registry data model is deployed, the system creates a REST API endpoint for each search condition using the table name without the prefix but with a dash-case convention—for example, search-condition-test.
When you make a request to the /search-condition-test API resource, the response returns data from the search_condition_test_v view table.
- Example of calling the SC API:
-
https://<server-name>-<namespace>/search-condition-test?offset=0&limit=10.
3.1. Tag for creating a simple search condition
- Change type name:
<createSimpleSearchCondition> -
The
createSimpleSearchConditiontag creates a simple search condition, including a view for one table and an index for the specified search field.
XML schema example
<changeSet author="registry owner" id="searchConditionSimpleTest">
    <comment>CREATE simple test search condition</comment>
    <ext:createSimpleSearchCondition name="search_condition_simple_test" indexing="true" limit="all">
        <ext:table name="search_condition_simple_test" alias="c" searchType="equal" searchColumn="person_full_name"/>
    </ext:createSimpleSearchCondition>
</changeSet>| If you create an index without specifying the search field, the system will return an error. |
| For details on creating a simple search condition, see the XML template for a simple search condition (scenario 1) section. |
3.2. Tag for creating a search condition
- Change type name:
<createSearchCondition> -
The
createSearchConditiontag creates a search condition, including a view for several tables and their relationships.
|
This tag can also create indexes for each search field. Set the additional |
XML schema example
<ext:createSearchCondition name="search_condition" limit="1" indexing="true">
    <ext:table name="table_one" alias="to">
        <ext:column name="name" alias="to_name" searchType="equal"/>
        <ext:column name="type"/>
        <ext:function name="count" alias="cnt" columnName="uuid"/>
    </ext:table>
    <ext:table name="table_two" alias="tt">
        <ext:column name="name" alias="tt_name"/>
        <ext:column name="code"/>
    </ext:table>
    <ext:join type="left">
        <ext:left alias="to">
             <ext:column name="name"/>
     </ext:left>
        <ext:right alias="tt">
            <ext:column name="name"/>
        </ext:right>
    </ext:join>
    <ext:where>
        <ext:condition tableAlias="to" columnName="type"  operator="eq" value="'char'">
            <ext:condition logicOperator="or" tableAlias="to"
columnName="type" operator="eq" value="'text'"/>
        </ext:condition>
        <ext:condition logicOperator="and" tableAlias="tt" columnName="code" operator="similar" value="'{80}'"/>
    </ext:where>
 </ext:createSearchCondition>
|
|
For details on different scenarios of using search conditions, see the following sections: |
3.2.1. <ext:where> operator
- Possible values:
-
Value Description Symbol (Unicode) Comment eqequals
=
nenot equal
<>
gtgreater than
>
gegreater than or equal to
>=
ltless than
<
leless than or equal to
⇐
innotInisNullis null
If value =
true, then the column check is is null; if value =false, then the column check is is not null.similarsimilar
~
-
To specify a text value, wrap it in single quotes.
-
With
<ext:function>, you can use aggregate functions:min(),max(),avg(),count(),sum(). The fields used in these functions are removed from the output (SELECT). All other table fields are included in grouping (GROUP BY).
-
3.2.2. Search condition attributes and possible values
searchType attribute
The attribute searchType in the element <ext:column> indicates the type of operation needed for a specific column when searching in a table.
The attribute accepts the following values:
- equal
-
returns values with an exact match (equal) to the specified ones.
XML schema<ext:createSearchCondition name="search_condition"> <ext:table name="table_one"> <ext:column name="name" alias="to_name" searchType="equal"/> <ext:column name="type"/> <ext:function name="count" alias="cnt" columnName="uuid"/> </ext:table> </ext:createSearchCondition>Description of the tabletable_one-
name— field name -
type— field type -
uuid— unique identifier
What is the
countfunction needed for?The element
<ext:function>in the XML schema does not perform a search or data filtering function.The
countfunction in SQL counts the number of rows in the selection you get from the query. In our example<ext:function name="count" alias="cnt" columnName="uuid"/>, thecountfunction counts the number of records in theuuidcolumn and returns this number under the aliascnt.Here’s how it works:
-
name="count"indicates that you use thecountfunction. -
alias="cnt"specifies an alias for the computation result, which can be used for further references. -
columnName="uuid"specifies the column where you want to count the number of records.
For example, if there are ten records in the
uuidcolumn, the result of this function will be the number 10, which can be used in subsequent operations or displayed as a query result.SQL script (search query)SELECT name, type FROM table_one WHERE name = 'search_value'HTTP request with search parameter for theequaloperationGET https://.../search-condition?name=search_value&type=...This HTTP request performs a search on the resource
https://…/search-conditionfor an exact match of the name (fieldname) and type (fieldtype) with the specified value. Each search parameter is defined as a separate request parameter, making it more informative and understandable.HTTP request with reference valuesGET https://api.example.com/search-condition?name=John&type=EmployeeIn this example:
-
https://api.example.com/search-condition— base URL of the resource and endpoint where the search is performed. -
name=John— search parameter by name, where the valueJohnis searched for in thenamefield. -
type=Employee— search parameter by type, where the valueEmployeeis searched for in thetypefield.
-
startsWith-
returns values with the specified prefix, i.e., values that "start with" the specified condition.
XML schema<ext:createSearchCondition name="subject_name_starts_with"> <ext:table name="consent_table"> <ext:column name="consent_id" fetchType="entity" /> <ext:column name="document_copy" /> <ext:column name="legal_entity_name" sorting="asc" searchType="startsWith" /> <ext:column name="subject_id"/> </ext:table> </ext:createSearchCondition>Description of the tableconsent_table-
consent_id— consent identifier, which links to another table (fetch type:entity).For more information about the fetchTypeattribute and its application scenarios, see section Using nested structures in registry database tables by a specified parameter. -
document_copy— a scanned copy of the document. -
legal_entity_name— name of the legal entity, which can be used for "starts with" type of search. -
subject_id— subject identifier.
SQL script (search query)SELECT legal_entity_name FROM consent_table WHERE legal_entity_name LIKE 'search_value%' ORDER BY legal_entity_name ASC;In this query:
-
Names of legal entities (
legal_entity_name) are selected from theconsent_table. -
The search is based on the "starts with" principle for the value
'search_value'. -
The results are alphabetically sorted by the legal entity name (ascending).
HTTP request with search parameter for thestartsWithoperationGET https://.../subject-name-starts-with?legal_entity_name=search_valueThis HTTP request uses the GET method to query the server to retrieve results that match the "starts with" search criteria for the
legal_entity_namefield.HTTP request with reference valuesGET https://api.example.com/subject-name-starts-with?legal_entity_name=CorpIn this example:
-
https://api.example.com/subject-name-starts-with— this is the base URL of the resource where the search takes place. -
legal_entity_name=Corp— request parameter indicating a search for legal entities whose names start withCorp.
-
Sure, here’s the translation while preserving the syntax:
contains-
returns values that match the specified condition value anywhere in the string (at the beginning, middle, end, etc.).
XML schema<ext:createSearchCondition name="search_condition" limit="1"> <ext:table name="table_two" alias="tt"> <ext:column name="name" alias="tt_name"/> <ext:column name="code" searchType="contains"/> <ext:function name="sum" alias="sm" columnName="code"/> </ext:table> </ext:createSearchCondition>Learn more about the limitattribute in section limit attribute.Description of thetable_twotable-
name(aliastt_name) — name of the item. -
code— item code that can be used for "contains" type search. -
sum— a function that calculates the sum of the values in thecodecolumn and returns this number under the aliassm.What is the purpose of the
sumfunction?The
<ext:function>element in the XML schema does not perform a search or data filtering function.The
sumfunction in SQL calculates the total sum of values in a specified selection column. In our example<ext:function name="sum" alias="sm" columnName="code"/>, thesumfunction calculates the total sum of values in thecodecolumn and returns this sum under the aliassm.Here’s how it works:
-
name="sum"indicates that you use thesumfunction. -
alias="sm"specifies an alias for the calculation result, which can be used for further references to this result. -
columnName="code"specifies the column where you want to calculate the total sum of values.
For example, if the
codecolumn has entries with values 10, 20, and 30, the result of this function will be the number 60, which can be used in further operations or output as a query result. -
SQL script (search query)SELECT name, code FROM table_two WHERE code LIKE '%search_value%'In this query:
-
Names (
name) and codes (code) are selected from thetable_twotable. -
The type performs the search "contains" for the value
'search_value', which can be anywhere in the string.
HTTP request with thecontainssearch parameterGET https://.../search-condition?code=search_valueThis HTTP request uses the GET method to query the server to obtain results that match the "contains" search criterion for the
codefield.HTTP request with reference valuesGET https://api.example.com/search-condition?code=1234ABIn this example:
-
https://api.example.com/search-condition— is the base URL of the resource and endpoint where the search is conducted. -
code=1234AB— a query parameter that specifies a search for codes containing1234AB.
-
in-
returns values that match (equal) the specified values in the array. Similar to
equal, but multiple.XML schema<ext:createSearchCondition name="find_in_age"> <ext:table name="users"> <ext:column name="first_name" returning="true"/> <ext:column name="last_name" returning="true"/> <ext:column name="user_age" searchType="in"/> </ext:table> </ext:createSearchCondition>Description of theuserstable-
first_name— user’s first name, returned as a result. -
last_name— user’s last name, also returned. -
user_age— user’s age, which can be used for multiple searches using theinoperator.
Learn more about the returningattribute in section returning attribute.SQL script (search query)SELECT first_name, last_name FROM users WHERE user_age IN (search_value)In this query:
-
First names (
first_name) and last names (last_name) are selected from theuserstable. -
The search is performed by age (
user_age), which should be one of the values specified in the setsearch_value.
HTTP request using theinoperatorGET https://.../find-in-age?user_age=search_valueThis HTTP request uses the GET method to query the server to obtain results that match the "in list" search criterion for the
user_agefield.HTTP request with reference valuesGET https://api.example.com/find-in-age?user_age=25,30,35In this example:
-
https://api.example.com/find-in-age— is the base URL of the resource and endpoint where the search is conducted. -
user_age=25,30,35— a query parameter that specifies a search for users aged 25, 30, or 35 years.
-
notIn-
returns values that do not match any of the specified values in the array. It is the opposite of the
invalue of thesearchTypeattribute.XML schema<ext:createSearchCondition name="find_not_in_age"> <ext:table name="users"> <ext:column name="first_name" returning="true"/> <ext:column name="last_name" returning="true"/> <ext:column name="user_age" searchType="notIn"/> </ext:table> </ext:createSearchCondition>Description of theuserstable-
first_name— user’s first name, returned as a result. -
last_name— user’s last name, also returned. -
user_age— user’s age, which can be used for multiple searches but excluding the values specified in thenotInoperator.
Learn more about the returningattribute in section returning attribute.SQL script (search query)SELECT first_name, last_name FROM users WHERE user_age NOT IN (search_value)In this query:
-
First names (
first_name) and last names (last_name) are selected from theuserstable. -
The search is performed by age (
user_age), which should NOT be one of the values specified in the setsearch_value.
HTTP request using thenotInoperatorGET https://.../find-not-in-age?user_age=search_valueThis HTTP request uses the GET method to query the server to obtain results that DO NOT match the "in list" search criterion for the
user_agefield.HTTP request with reference valuesGET https://api.example.com/find-not-in-age?user_age=25,30,35In this example:
-
https://api.example.com/find-not-in-age— is the base URL of the resource and endpoint where the search is conducted. -
user_age=25,30,35— a query parameter that specifies a search for users who are NOT aged 25, 30, or 35 years.
-
between-
returns values that belong to a specified range of values (inclusive of both "from" and "to").
XML schema<ext:createSearchCondition name="find_between_age"> <ext:table name="users"> <ext:column name="first_name" returning="true"/> <ext:column name="last_name" returning="true"/> <ext:column name="user_age" searchType="between"/> </ext:table> </ext:createSearchCondition>Description of theuserstable-
first_name— user’s first name, returned as a result. -
last_name— user’s last name, also returned. -
user_age— user’s age, which can be used for searching within the specified range (inclusive) using thebetweenoperator.
Learn more about the returningattribute in section returning attribute.SQL script (search query)SELECT first_name, last_name FROM users WHERE user_age BETWEEN value_from AND value_toIn this query:
-
First names (
first_name) and last names (last_name) are selected from theuserstable. -
The search is performed by age (
user_age), which should fall within the range fromvalue_fromtovalue_to(inclusive).
HTTP request using thebetweenoperatorGET https://.../find-between-age?user_age_from=value_from&user_age_to=value_toThis HTTP request uses the GET method to query the server to obtain results that match the "between" search criterion for the
user_agefield.HTTP request with reference valuesGET https://api.example.com/find-between-age?user_age_from=20&user_age_to=30In this example:
-
https://api.example.com/find-between-age— is the base URL of the resource and endpoint where the search is conducted. -
user_age_from=20&user_age_to=30— query parameters that specify a search for users aged between 20 and 30 years (inclusive).
-
limit attribute
The limit attribute specifies the maximum number of results (rows) to return in an API response for a search condition.
- Possible values:
-
-
limit="all": Returns all results for a search condition. -
limit="10"(any number provided as string): Returns a limited number of results for a search condition.
If this attribute is not specified, all results are returned. -
For example, if the limit attribute in the <ext:createSimpleSearchCondition> tag has a value of 10, the maximum number of results that the API for the search condition will return will be 10.
<changeSet author="registry owner" id="searchConditionSimpleTest">
    <comment>CREATE simple test search condition</comment>
    <ext:createSimpleSearchCondition name="search_condition_simple_test" indexing="true" limit="10">
        <ext:table name="search_condition_simple_test" alias="c" searchType="equal" searchColumn="person_full_name"/>
    </ext:createSimpleSearchCondition>
</changeSet>
In other words, if the search_condition_simple_test table has more than 10 records that meet the search criteria defined in the <ext:createSimpleSearchCondition> tag, and the limit attribute is set to 10, the search condition will return only the first 10 rows.
indexing attribute
The indexing attribute automatically creates indexes for the columns that are searched.
- Possible values:
-
-
indexing="true": Create an index. -
indexing="false": Don’t create an index.You can omit this attribute if you don’t need to create indexes. Use indexing="false"when it is necessary to state this in the data model schema explicitly.
-
<changeSet author="registry owner" id="searchConditionSimpleTest">
    <comment>CREATE simple test search condition</comment>
    <ext:createSimpleSearchCondition name="search_condition_simple_test" indexing="true" limit="10">
        <ext:table name="search_condition_simple_test" alias="c" searchType="equal" searchColumn="person_full_name"/>
    </ext:createSimpleSearchCondition>
</changeSet>
The indexing="true" attribute in the <ext:createSimpleSearchCondition> tag indicates that indexing for the specified column (person_full_name) must be enabled.
In this example, an index will be created for the person_full_name column since indexing is set to true. The index speeds up the search, reduces the time it takes to process the queries, and makes them more efficient.
returning attribute
The returning attribute indicates whether to return a value in an API response.
- Possible values:
-
-
returning="true": Return the value. -
returning="false": Don’t return the value.
-
<changeSet author="registry owner" id="searchCondition test">
	<comment>CREATE test search condition</comment>
	<ext:createSearchCondition name="searchConditionTest" indexing="true">
		<ext:table name="consent_data_person" alias="c">
			<ext:column name="person_full_name" searchType="equal" returning="true" type="text"/>
			<ext:column name="person_pass_number" returning="true" type="varchar"/>
			<ext:column name="consent_date" returning="true"/>
		</ext:table>
		<ext:table name="consent_subject" alias="cs">
			<ext:column name="legal_entity_name" alias="srch_legal_entity_name" returning="true"/>
			<ext:column name="edrpou" alias="srch_edrpou" returning="true"/>
		</ext:table>
		<ext:join type="inner">
			<ext:left alias="c">
				<ext:column name="consent_id"/>
			</ext:left>
			<ext:right alias="cs">
				<ext:column name="consent_id"/>
			</ext:right>
		</ext:join>
	</ext:createSearchCondition>
</changeSet>
If the returning attribute in the <ext:column> element is set to true, the values of the corresponding column will be included in the query result.
In this example, the values of person_full_name, person_pass_number, and consent_date columns from the consent_data_person table and the legal_entity_name and edrpou columns from the consent_subject table will be included in the query result since returning is set to true.
By default, returning is set to true. If you want to exclude the values of specific columns from the response, set returning="false".
|
pagination attribute
Allowing external systems to run requests works by adding the <exposeSearchCondition> tag (for details, jump to Tag for setting integration points with other registries and external systems).
|
The pagination attribute can have the following values:
- offset
-
Returns a specified number of records, considering offset-based pagination. In an API request, the number of records is determined by the
limitparameter.By default, pagination is enabled and set as pagination="offset".- How do offset and limit work?
-
Consider a table with 100 records.
To get just the first 10 records (from 1 to 10), set your API request to
offset=0(or omit it) andlimit=10.To get the next 10 records (from 11 to 20), set
offset=10andlimit=10. If you need to get the records from 11 to 30, setoffset=10andlimit=20, and so on.This way, the records in a request are offset by 10s.
Example 4. Creating a search condition in the registry data model using the pagination="offset" attribute<changeSet author="registry owner" id="create SC get_requests_by_search_param_offset"> <ext:createSearchCondition name="get_requests_by_search_param_offset" pagination="offset"> <ext:table name="request_by_search_param"> <ext:column name="request_by_search_param_id"/> <ext:column name="name"/> <ext:column name="search_param"/> </ext:table> </ext:createSearchCondition> </changeSet>This example creates a search condition called
get_requests_by_search_param_offsetand allows querying therequest_by_search_paramtable using thesearch_paramparameter with offset-based pagination (thepagination="offset"attribute).Example 5. An HTTP request using query "offset" and "limit" parametershttps://registry-rest-api-mdtu-ddm-edp-cicd-platform-demo.apps.cicd2.mdtu-ddm.projects.epam.com/get-requests-by-search-param-offset?offset=0&limit=10Example 6. API response[ { "searchParam": "string", "requestBySearchParamId": "3fa85f64-5717-4562-b3fc-2c963f66afa6", "name": "string" } ]Example of OpenAPI specification
- page
-
Returns information about the current page, the number of items on the page, the total number of items, and the total number of pages.
By default, pagination is enabled and set as pagination="offset".Example 7. Creating a search condition using the pagination="page" attribute<changeSet author="registry owner" id="create SC get_requests_by_search_param_page"> <ext:createSearchCondition name="get_requests_by_search_param_page" pagination="page"> <ext:table name="request_by_search_param"> <ext:column name="request_by_search_param_id"/> <ext:column name="name"/> <ext:column name="search_param"/> </ext:table> </ext:createSearchCondition> </changeSet>This example creates a search condition called
get_requests_by_search_param_pageand allows querying therequest_by_search_paramtable using thesearch_paramparameter with page-based pagination (thepagination="page"attribute).Example 8. An HTTP request using query "pageSize" and "pageNo" parametershttps://registry-rest-api-mdtu-ddm-edp-cicd-platform-demo.apps.cicd2.mdtu-ddm.projects.epam.com/get-requests-by-search-param-page?pageSize=10&pageNo=0- Request query parameters:
-
-
pageSize: The number of elements on the page.10by default. -
pageNo: The page number.0by default.
-
Example 9. API response{ "content": [ { "searchParam": "string", "name": "string", "requestBySearchParamId": "3fa85f64-5717-4562-b3fc-2c963f66afa6" } ], "totalElements": 0, "totalPages": 0, "pageNo": 0, "pageSize": 10 }- API returns the following attributes:
-
-
content: An array of elements that match the search criteria. -
totalElements: The total number of elements requested. -
totalPages: The total number of pages requested. -
pageSize: The number of elements on the page. -
pageNo: The page number being returned.
-
An example of OpenAPI specification
- none
-
This attribute allows disabling pagination for API queries.
By default, pagination is enabled and set as pagination="offset".Example 10. Creating a search condition using the pagination="none" attribute<changeSet author="registry owner" id="create SC get_requests_by_search_param_none"> <ext:createSearchCondition name="get_requests_by_search_param_none" pagination="none"> <ext:table name="request_by_search_param"> <ext:column name="request_by_search_param_id"/> <ext:column name="name"/> <ext:column name="search_param"/> </ext:table> </ext:createSearchCondition> </changeSet>This example creates a search condition called
get_requests_by_search_param_noneand allows querying therequest_by_search_paramtable using thesearch_paramparameter without pagination (thepagination="none"attribute).
3.2.3. Using the JOIN operation with AND and OR conditions
The <ext:join> operation enables joining tables using different conditions. It is used when creating search conditions inside the <ext:createSearchCondition> tag to get the necessary data in roll-up tables.
- There are three main join types:
-
-
INNER JOIN: An intersection of data from two tables. For example,
<ext:join type="inner">. -
LEFT JOIN: Extracts data from the first table (left) and joins data from the second table (right) where possible. For example,
<ext:join type="left">. -
RIGHT JOIN: The opposite of LEFT JOIN. For example,
<ext:join type="right">.
-
You can use the <ext:join> operation with additional AND and OR operators, which you can define within the <ext:condition> tag as the value of the logicOperator attribute.
<ext:createSearchCondition name="get_regions_or_citi_regions">
	<ext:table name="katottg" alias="k">
		<ext:column name="katottg_id" />
		<ext:column name="name" alias="name_region" searchType="startsWith" />
		<ext:column name="category" />
	</ext:table>
	<ext:table name="katottg_category" alias="cat">
		<ext:column name="name" alias="name_category" />
		<ext:column name="code" />
	</ext:table>
	<ext:join type="inner">
		<ext:left alias="k">
			<ext:column name="category" />
		</ext:left>
		<ext:right alias="cat">
			<ext:column name="code" />
		</ext:right>
	</ext:join>
</ext:createSearchCondition><ext:createSearchCondition name="get_regions_or_citi_regions">
<ext:table name="katottg" alias="k">
<ext:column name="katottg_id" />
<ext:column name="name" alias="name_region" searchType="startsWith" />
<ext:column name="category" />
</ext:table>
<ext:table name="katottg_category" alias="cat">
<ext:column name="name" alias="name_category" />
<ext:column name="code" />
</ext:table>
<ext:join type="inner">
<ext:left alias="k">
<ext:column name="category" />
</ext:left>
<ext:right alias="cat">
<ext:column name="code" />
</ext:right>
<ext:condition logicOperator="and" columnName="k.category" operator="eq" value="'K'"/>
</ext:join>
</ext:createSearchCondition><ext:createSearchCondition name="get_regions_or_citi_regions">
<ext:table name="katottg" alias="k">
<ext:column name="katottg_id" />
<ext:column name="name" alias="name_region" searchType="startsWith" />
<ext:column name="category" />
</ext:table>
<ext:table name="katottg_category" alias="cat">
<ext:column name="name" alias="name_category" />
<ext:column name="code" />
</ext:table>
<ext:join type="inner">
<ext:left alias="k">
<ext:column name="category" />
</ext:left>
<ext:right alias="cat">
<ext:column name="code" />
</ext:right>
<ext:condition logicOperator="or" columnName="k.category" operator="eq" value="cat.code">
<ext:condition logicOperator="and" columnName="k.category" operator="ne" value="'K'"/>
<ext:condition logicOperator="and" columnName="k.level" operator="eq" value="'1'"/>
</ext:condition>
</ext:join>
</ext:createSearchCondition>|
To learn more about using JOIN and additional operators, see Scenarios of combining tables using JOIN with additional AND and OR conditions. |
3.3. Tag for deleting a search condition
- Change type name:
<dropSearchCondition> -
The
dropSearchConditiontag deletes a search condition.
XML schema example
<ext:dropSearchCondition name="search_condition"/>|
For details, see the following section: XML template for deleting a search condition. |
3.4. Tag for setting integration points with other registries and external systems
- Change type name:
<exposeSearchCondition> -
The
exposeSearchConditiontag enables you to set integration points with other registries and external systems.
XML schema example
<ext:exposeSearchCondition name="viewForDrop" platform="true" externalSystem="true" trembita="false"/>- The exposeSearchCondition tag accepts the following attributes:
-
-
name: search condition name. -
platform: provides access to the registry’s VIEWs and REST API for another registry on the Platform. -
externalSystem: provides access to the registry’s VIEWs and REST API for an external system. -
trembita: provides access to the registry’s VIEWs and SOAP API for external systems/registries via the "Trembita" Secure exchange gateway.The "Trembita" functionality is specific to the Ukrainian implementation and may not apply or function as described in other contexts or regions. Please consult the local guidelines or documentation if you are implementing this outside Ukraine.
-
4. Managing custom data types
4.1. Tag for creating an enumerated data type (ENUM)
- Change type name:
<createType> <ext:asEnum> -
This tag creates an enumerated data type (ENUM).
XML schema example
<ext:createType name="type_gender">
    <ext:asEnum>
        <ext:label translation="Жіноча">FEMALE</ext:label>
        <ext:label translation="Чоловіча">MALE</ext:label>
    </ext:asEnum>
</ext:createType>
4.2. Tag for creating a composite data type
- Change type name:
<createType> <ext:composite> -
This tag creates a composite data type.
XML schema example
<ext:createType name="field_access_type">
    <ext:composite>
        <ext:column name="masked_value" type="TEXT" collation="uk_UA.utf8"/>
        <ext:column name="opened" type="BOOLEAN"/>
         <ext:column name="private" type="BOOLEAN"/>
        <ext:column name="confidential" type="BOOLEAN"/>
        <ext:column name="secret" type="BOOLEAN"/>
        <ext:column name="service" type="BOOLEAN"/>
    </ext:composite>
</ext:createType>| For details, see the following section: Schema for creating enumerated and composite data types. |
4.3. Tag for deleting a data type
- Change type name:
<dropType> -
The
dropTypetag deletes a data type.
XML schema example
<ext:dropType name=" type_gender"/>4.4. A tag for creating a custom data type with optional constraints
- Change type name:
<createDomain> -
The
createDomaintag creates a custom data type with optional constraints.
XML schema example
<ext:createDomain name="dn_passport_num"
dataType="CHAR(8)">
    <ext:constraint implementation="NOT NULL"/>
    <ext:constraint name="passport_number_chk"
implementation="CHECK (VALUE ~ '^[АВЕІКМНОРСТХ]{2}[0-9]{6}$)"/>
</ext:createDomain>| For details, see the following section: Schema for creating a domain data type. |
4.5. Tag for deleting custom data types
- Change type name:
<dropDomain> -
The
dropDomaintag deletes a custom data type.
XML schema example
<ext:dropDomain name=" dn_passport_num"/>5. Creating a many-to-many relationship type
- Change type name:
<createMany2Many> -
The
createMany2Manytag creates a many-to-many relationship type that performs the following functions:-
Creates a data view by unwrapping an array into rows.
-
Creates an index.
-
XML schema example
<ext:createMany2Many
    mainTableName="table1"
    mainTableKeyField="column_id"
    referenceTableName="table2"
referenceKeysArray="columns"/>-
where
"columns"has the following type:"UUID[ ]"— an array of identifiers.
| For details on creating relationships between the tables, see the following section: Schema for modeling relationships between database entities. |
6. Saving multiple entities within a single transaction
- Change type name:
<createCompositeEntity> -
The
createCompositeEntitytag enables you to save multiple entities within a single transaction.
XML schema example
<ext:createCompositeEntity name="nested_tables">
    <ext:nestedEntity table="table_one">
        <ext:link column="two_column_id" entity="table_two"/>
    </ext:nestedEntity>
    <ext:nestedEntity name="tableTwo" table="table_two">
         <ext:link column="three_column_id" entity="table_three"/>
     </ext:nestedEntity>
     <ext:nestedEntity name="tableThree" table="table_three"/>
</ext:createCompositeEntity>
7. Generating endpoints for partial updates of database entities
- Change type name:
<partialUpdate> -
The
partialUpdatetag generates endpoints for updating separate parts of an entity.
XML schema example
<partialUpdate table="table_name">
    <column>column_name1</column>
    <column>column_name2</column>
    <column>column_name3</column>
</partialUpdate>
8. Managing analytics views
8.1. Tag for creating an analytics view
- Change type name:
<createAnalyticsView> -
The
createAnalyticsViewtag creates analytics views on a replica.
XML schema example
<ext:createAnalyticsView name="report_table_name">
    <ext:table name="table_name">
        <ext:column name="column1"/>
         <ext:column name=" column2"/>
    </ext:table>
</ext:createAnalyticsView>
8.2. Tag for deleting an analytics view
- Change type name:
<dropAnalyticsView> -
The
dropAnalyticsViewtag deletes analytics views on a replica.
XML schema example
<ext:dropAnalyticsView name="report_table_name"/>8.3. Tag for creating an index
- Change type name:
<createAnalyticsIndex> -
The
createAnalyticsIndextag creates an index only on a replica.
XML schema example
<ext:createAnalyticsIndex tableName="table" indexName="idx_table__column">
    <column name="column"/>
</ext:createAnalyticsIndex>
9. Managing access rights to analytical data
9.1. Tag for granting access to all analytics views
- Change type name:
<grantAll> -
The
grantAlltag grants access to all analytics views for a specific role.
XML schema example
<ext:grantAll>
    <ext:role name="analytics_officer"/>
</ext:grantAll>
9.2. Tag for revoking access to all analytics views
- Change type name:
<revokeAll> -
The
revokeAlltag revokes access to all analytics views for a specific role.
XML schema example
<ext:revokeAll>
    <ext:role name="analytics_officer"/>
</ext:revokeAll>
9.3. Tag for granting access to an individual analytics view
- Change type name:
<grant> -
The
granttag grants access to an individual analytics view for a specific role.
XML schema example
<ext:grant>
	<ext:role name="analytics_officer">
		<ext:view name="report_pd_processing_consent"/>
	</ext:role>
	<ext:role name="analytics_officer">
		<ext:view name="report_pd_processing_consent"/>
	</ext:role>
</ext:grant>
9.4. Tag for revoking access to an individual analytics view
- Change type name:
<revoke> -
The
revoketag revokes access to an individual analytics view for a specific role.
XML schema example
<ext:revoke>
	<ext:role name="analytics_officer">
		<ext:view name="report_pd_processing_consent"/>
	</ext:role>
</ext:revoke>
10. Using nested structures in registry database tables by a specified parameter
10.1. Tag for using nested structures
- Change type name:
<tableReadParameters> -
The
tableReadParameterstag enables you to model nested structures in registry database tables by a specified parameter.
|
You can specify the It applies to two types of relationships:
The
|
XML schema example with a "tableReadParameters" tag
<ext:tableReadParameters table="person_type_vpo">
    <ext:column name="consents" fetchType="entity"/>
</ext:tableReadParameters>
XML schema example with a "fetchType" attribute
<ext:createSearchCondition name="vpo_person_equals_id_with_fetch_type_person">
    <ext:table name="vpo_person_many_types">
        <ext:column name="consent_id" fetchType="entity" />
        <ext:column name="scan_copy" />
        <ext:column name="legal_entity_name" sorting="asc" searchType="startsWith" />
        <ext:column name="consent_subject_id"/>
    </ext:table>
</ext:createSearchCondition>-
Table 1 has a Many2Many relationship with Table 2.
-
Table 1 has a column with an array of IDs (foreign keys to Table 2).
-
When a resource from Table 1 is requested, Table 1 fields referencing Table 2 must have values corresponding to Table 2 records in the response.
{
   "vpoId":"57152fa5-742c-4b1e-bd53-acc36524cc2d",
   "vpoLastName":"Holmes",
   "vpoFirstName":"Jared",
   "vpoSecondName":"Oliver",
   "personTypes":[
      "2d89ffea-118c-4be9-9fa0-c3007991c811",
      "0d756563-d6a4-46fe-a0c8-ddf4a935ec35"
   ]
}[
{
"constantCode":"1100",
"name":"Large family",
"personTypeVpoId":"2d89ffea-118c-4be9-9fa0-c3007991c811"
},
{
"constantCode":"1200",
"name":"Kids",
"personTypeVpoId":"0d756563-d6a4-46fe-a0c8-ddf4a935ec35"
}
]vpo_person_type_contains_name search condition<changeSet author="registry owner" id="create SC vpo_person_equals_id_person_with_fetch_many_types">
<ext:createSearchCondition name="vpo_person_equals_id_person_with_fetch_many_types">
<ext:table name="vpo_person_many_types">
<ext:column name="vpo_person_many_id" searchType="equal"/>
<ext:column name="vpo_first_name" />
<ext:column name="vpo_last_name"/>
<ext:column name="vpo_second_name"/>
<ext:column name="person_types" fetchType="entity"/>
</ext:table>
</ext:createSearchCondition>
</changeSet><changeSet id="table t_person_table_many2many_fetch_id" author="registry owner">
<createTable tableName="t_person_table_many2many_fetch_id" ext:isObject="true" ext:historyFlag="true" remarks="VPO">
<column name="id" type="UUID" defaultValueComputed="uuid_generate_v4()" remarks="VPO identifier">
<constraints nullable="false" primaryKey="true" primaryKeyName="pk_t_person_table_many2many_fetch_id"/>
</column>
<column name="name" type="TEXT" remarks="name">
<constraints nullable="false"/>
</column>
<column name="person_types" type="UUID[]" remarks="IDs array"/>
</createTable>
<ext:createMany2Many mainTableName="t_person_table_many2many_fetch_id"
mainTableKeyField="id"
referenceTableName="person_type_vpo"
referenceKeysArray="person_types"/>
<ext:tableReadParameters table="t_person_table_many2many_fetch_id">
<ext:column name="person_types" fetchType="entity"/>
</ext:tableReadParameters>
</changeSet>{
"vpoId":"57152fa5-742c-4b1e-bd53-acc36524cc2d",
"vpoLastName":"Holmes",
"vpoFirstName":"Jared",
"vpoSecondName":"Oliver",
"personTypes":[
"2d89ffea-118c-4be9-9fa0-c3007991c811",
"0d756563-d6a4-46fe-a0c8-ddf4a935ec35"
]
}{
"vpoId":"57152fa5-742c-4b1e-bd53-acc36524cc2d",
"vpoLastName":"Holmes",
"vpoFirstName":"Jared",
"vpoSecondName":"Oliver",
"personTypes":[
{
"id":"2d89ffea-118c-4be9-9fa0-c3007991c811",
"constantCode":"1100",
"name":"Large family"
},
{
"id":"0d756563-d6a4-46fe-a0c8-ddf4a935ec35",
"constantCode":"1200",
"name":"Kids"
}
]
}11. Managing the code review process
You can configure attributes in the data model to exclude individual change sets or entire files from the deployment process of the Code Review pipeline. This helps accelerate the code review process when working with the registry data model in scope of version candidates in the Administrative portal. For details on working with the data model in scope of version candidates, see Registry data model tables and their structures.
|
The Code Review pipeline is a process to ensure the code meets quality requirements and coding standards. The main Code Review pipeline in your registry regulations is https://admin-tools-<registry-service-name>.<dns-wildcard>/cicd/job/registry-regulations/job/MASTER-Code-review-registry-regulations/ where When working with the registry’s data model in the scope of version candidates, the Code Review pipeline additionally deploys a temporary replica of the registry database. The corresponding step is shown in the image below. 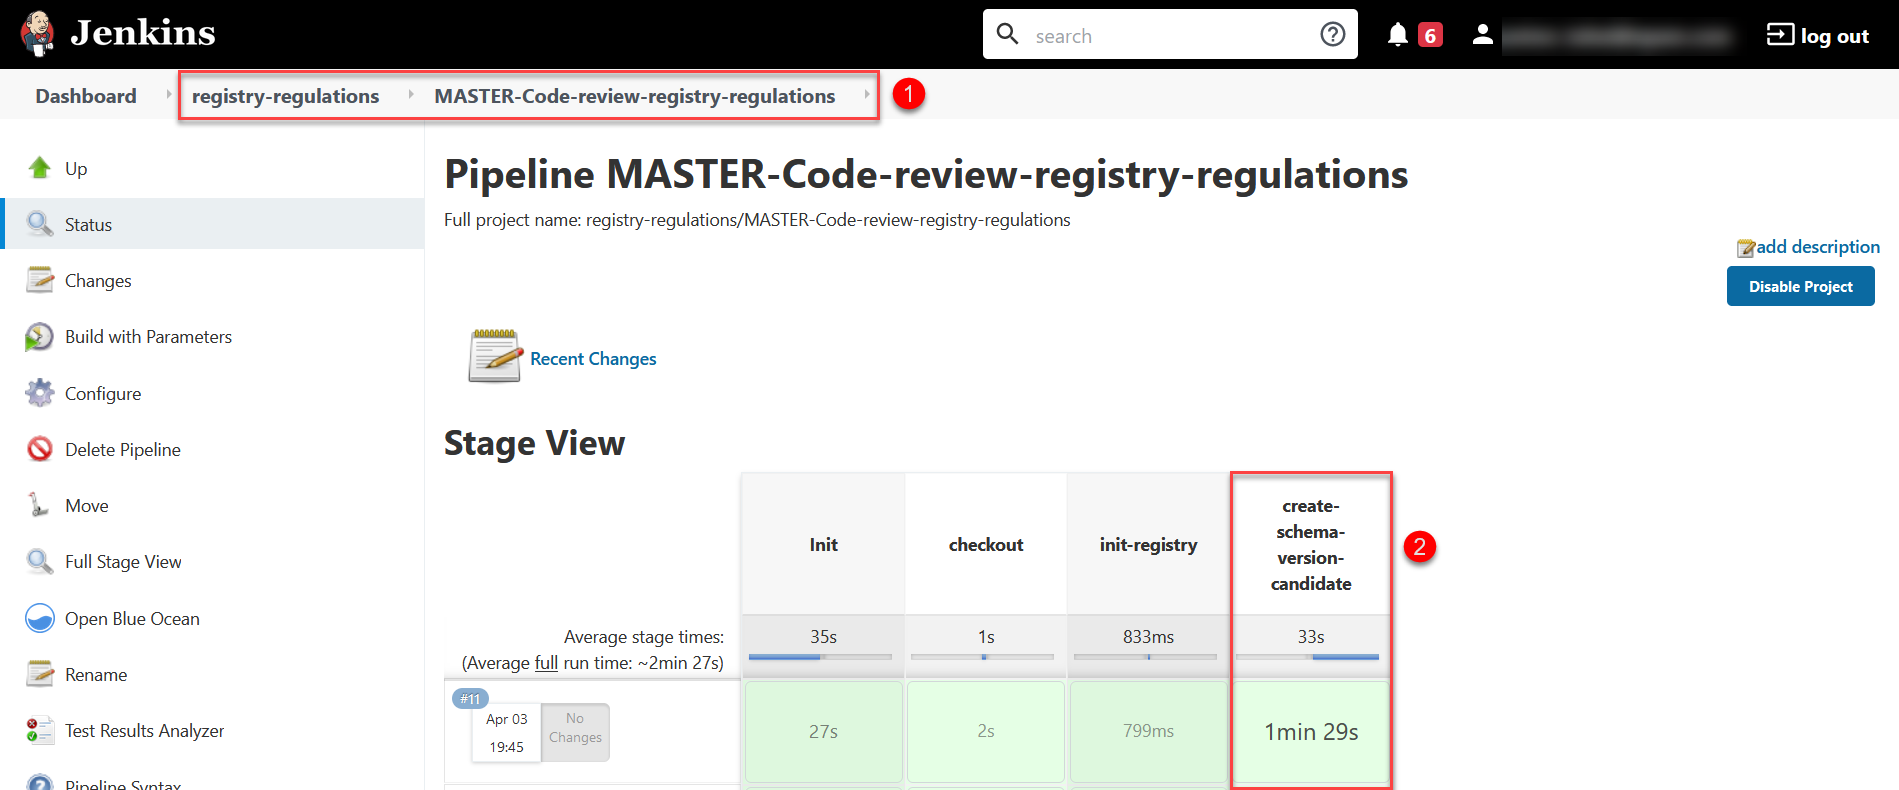
Figure 3. An overview of the MASTER-Code-review-registry-regulations pipeline
|
Configuring the data model
You can exclude changes from the Code Review pipeline using the context="!code-review" attribute in two ways:
-
Exclude a specific change set. To do this, add the
context="!code-review"attribute at the<changeSet>tag level. Figure 4. Excluding a specific changeSet from the Code Review pipeline
 -
Exclude an entire file with changes. To do this, add the
context="!code-review"attribute at the<include>tag level.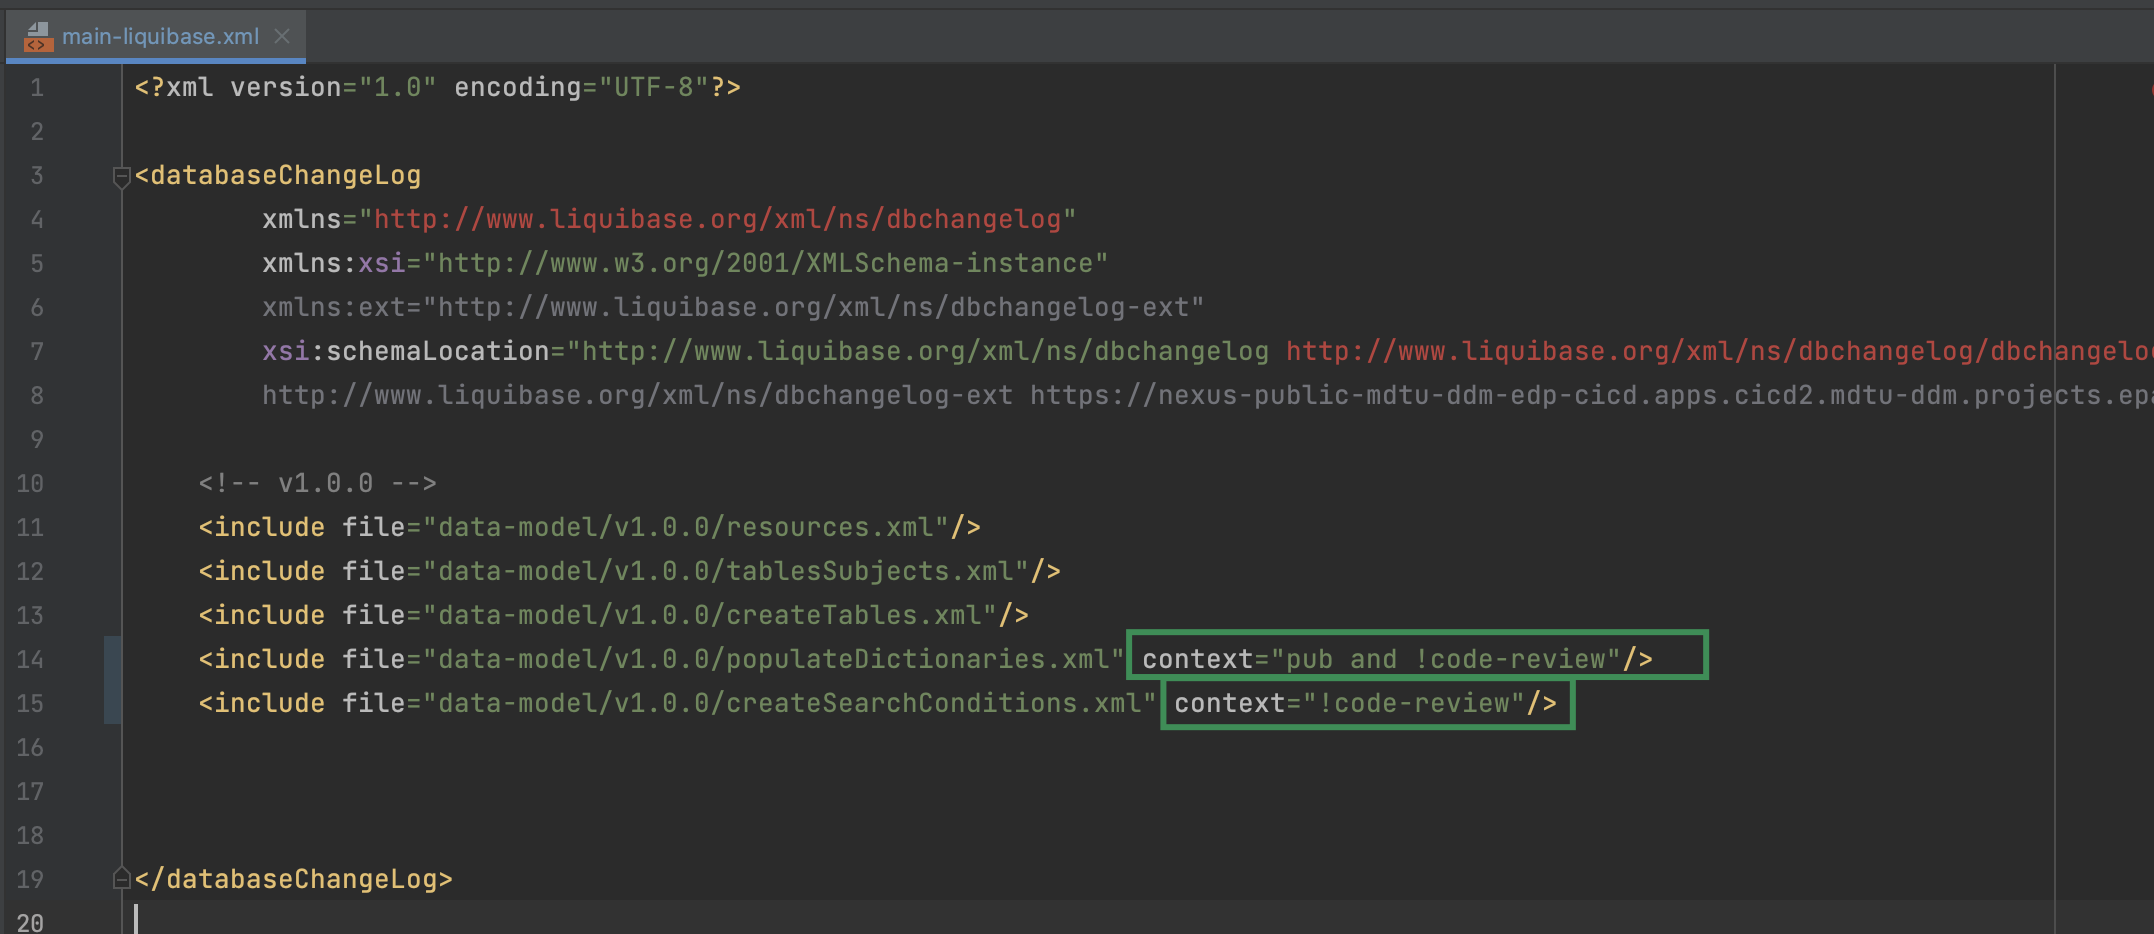 Figure 5. Excluding a file from the Code Review pipeline
|
If the tag already contains the |
|
If you add If you add |